Showing posts with label Crafts. Show all posts

Tuesday, June 22, 2010

Floral Bib Necklace and Earrings

I found this awesome tutorial from Larissa over at Just Another Day in Paradise for a beautiful floral bib necklace:

I love it! I didn't have brads that would have worked for this so I used buttons and beads from other leftover projects! I adore it!!!!

I decided I needed some matching earrings...


Found the camera today under the front seat of the car! Tune in tomorrow to see more necklaces that I've created!

LoVe!
~Amy~

Crafts from the Cell Phone Files...

I had this cheapo tv stand made out of particle board I guess, that I bought on clearance at a CVS for like $5 a couple years ago. I found something better for my tv in the bedroom at the flea market, but didn't want to throw this out. So I whipped out the scrapbooking paper and modpodge and here we go. Basically I traced the pieces on the paper, cut out, mod podged, sanded the edges, punched holes to reconnect the pieces, and put on a finish coat. The top I just cut out without drawing and pieced everything together on top. It's in my hallway now... I LOVE it! (The picture frames on top I'll have to take a better pic of... they are pages from the Green Stack set at JoAnn's with chipboard letters that spell out JOY.)


I love Sara over at Sara's Art House... I want her house... badly. My house consists of a red and white kitchen, very pale yellow living room (like lighter than ivory), a periwinkle craft room, purple spare room, and pale pink bedroom. I wanted some BRIGHT, cheery colors! I just slapped this paint on the canvas, realized it doesn't go anywhere in my house, and decided I'll take it to my new classroom! :)

Here's my inspiration: http://sara-mincy.blogspot.com/ (Check out the right sidebar... there's some small pics of hers there!)


Fabric Flower Pins

Tutorial: http://myblondeambitions.blogspot.com/2010/03/fabric-flower-tutorial.html
Note: I used my glue gun instead of sewing and I bought scrapbooking brads from JoAnn's for $2.99 and $3.99 to use in the center (I poked it through and then glued the felt with the pin over the arms).


Dahlia Brooch

Tutorial: http://www.notmartha.org/archives/2010/05/06/mothers-day-felt-dahlia-corsage-a-few-notes/
Note: I used hot glue on all of it and left off the pocket!


Dog Biscuits

Recipe: http://robertapm28.blogspot.com/2010/02/recipe-dog-bone-treats.html
Note: I'll admit it... I taste tested them... and BLECK! The dog loved them though, and so did his doggy friends that we shared with. :)

Monday, April 26, 2010

Aquarium Background Project


Alright, so this summer I bought an aquarium from my brother for my pet turtle. He says it's 100 gallons, I'm not sure if it's really that big... but it's sizable. Anyway, it was going to make it's home in my living room because there's no room anywhere else in the house! So, I put it in front of the window and HATED seeing the cords and window through the back... I needed a background.
The catch...

I HATE the generic ocean themed backs (sorry for those of you that have them, no offense, it just doesn't suit me!)!

Instead I went to Walmart, bought myself two poster boards and a roll of wrapping paper. If failed to take pictures of the process, but here are the steps!

1. Measure the size of your tank, tape your two poster boards together and cut off the excess.

2. Cover small portions in Mod Podge and affix your wrapping paper to the poster board, smoothing out bubbles as you go.

3. Trim off excess wrapping paper and flip your board over.

4. Add any needed embellishments. I made my poppy flower with construction paper and used a permanent marker to draw the swirlies!

5. Scotch tape onto the back of your tank! You're done! :)


OH!

And... that aquarium stand?

My brother had totally ghetto'd it up with unfinished two by fours and scraps of wood from other furniture to make it more 'stable'. We took the raw two by four pieces off the sides and then he 'helped' (sorta forced/bribed him) to spray paint the multi-colored fake wood finishes all white. I distressed the edges some and later used foam stamps and paint to decorate it with a couple pink flowers and green swirly accents. I'll have to post that pic later! Hope you enjoyed!

Wednesday, March 31, 2010

2 Quick Projects & 1 New Pair of Shoes

Project One:
What is this you ask?
Maybe you're thinking it's a decorated wooden block...
Or perhaps just a small plaque?

Nope.

and...

Nope.

It's a chalkboard eraser!!!

I have a post to show later of my shelf/coat hanger redo where I destroyed a scratched mirror and turned it into a chalkboard. When I put it on display I knew I needed the eraser, but didn't like having it just sitting up on the shelf... so I mod podged some white paper on, then added a scrap of burlap, hot glued on my chipboard letters and VOILA!

Project Two:
I LOVE the Family Rules that everyone has been making out in Blogland... but I don't have a family to make rules for! I doubt my six pets would follow the rules, not saying that they couldn't read them, just that they wouldn't even be able to see them if I didn't post them at floor level!

My solution: rules to craft by! I plan on hanging this on the door to my Craft Room in the hallway. It was super easy, just pick you rules, pick striped paper or some paper scraps, glue them down to a large piece of chipboard or wood and set everything out on the paper! Cute and so easy!

If you can't read mine they say:

Keep Calm and Craft On
1. Choose Happiness
2. Create
3. Be True 2 Yourself
4. Imagine
5. Do What You Love
6. Dream
7. Inspire
8. Flourish
9. See Differently

I spent an amazing day with my friend Sarah today for a late birthday celebration. She treated me to Chili's (my favorite) where we enjoyed their awesome chips and salsa (homemade in restaurant) and I had my fave monterrey chicken with loaded mashed potatoes and corn on the cob. We then did some shopping at Payless and JoAnn's, followed by going to see Alice in Wonderland! It was a great movie! I chose that over Remember Me because we figured Remember Me is probably sad and I said we should see Alice because it is full of bright colors (LOL)!

Here are some cute and super COMFY shoes I grabbed at Payless for $17.99!

I could sleep in these! There's a navy blue pair I'm totally thinking I need to go with the dress I posted about back on Monday!


LOVE!

Enjoy the rest of your week!

I will be hanging out with friends and forcing myself to do some grading and IEP paperwork for the return to school on Monday!

Monday, March 29, 2010

Beneath My Heart Linky Party and Inspired Project!


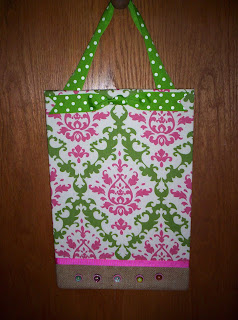
Okay this is my FAVORITE project of March! And it is all thanks to Traci over at Beneath My Heart and her awesome video tutorial! I love her!


Traci uses cork board on the back of her sheet metal... but I'm far too cheap to buy it so I just grabbed some foam board from Dollar Tree!


Glue the foam board around the edges of your sheet metal to make it thicker and prevent a trip to the hospital for stitches (haha). I cut it with my trusty box cutter (more daring adventure for me!)

Now, you flip that bad boy over and are ready to put on your fabric if it's thick. If it's not thick your metal will shine through. Traci spray painted hers... spray paint and I do not get along and it takes too much time... so I grabbed out the mod podge and covered it with a thin coat.

I had some tissue paper on hand from my recent birthday so I just grabbed it out of a nearby gift and smooshed it on the metal (seriously- I didn't even stress over wrinkles). Then you cut off the excess... if any holes appear just rip a piece from the excess and dab it over the hole.


Now, when I saw this fabric at JoAnn's I had no idea what I was going to do with it. I just knew that I NEEDED it. So I only got a half yard because I don't have the money to blow right now. Ended up that wasn't enough... uh oh... cept... I had leftover BURLAP! So I decided to add some burlap and ribbon for magnet parking at the bottom.

(BTW at some point in this process I ran out of hot glue and had to run to Dollar Tree to get more. I had a stare down with it in the craft aisle when I got the foam board on the first trip, but I was SURE I wouldn't run out *eye roll here*)

Okay, so there was a massive hunt for the magnets around my wreck of a house- but no fear I found them! I painted them pink because those awesome little pebble stickers didn't cover the whole magnet and I didn't like the black showing!
All together now.... OOOOOOOH!!!!!


AAAAAAAHHHHH!!!!


Thanks Traci!

Sunday, March 28, 2010

Fabulous Fabric

Have you been to JoAnn's lately? I went today... on a much needed distraction from life.
I was wandering around by the upholstery fabric and found these beauties (on sale for $6.99 a yard... wish I had the money to have bought a full yard of each)!


I ended up with the pink and green damask and the pink and green butterflies... to be made in to magnet boards as Traci from Beneath My Heart showed how to create on YouTube or you can get one at her etsy shop... she's more than a little awesome!

Finished project to be posted tomorrow, as long as my dog's health holds steady for the time being and there are no changes...

~Amy~

Saturday, January 9, 2010

Long Time No See...

Here's some of what I was up to the last month when I wasn't blogging...

Tote bag for one of my friend's four daughters whom I love...
(bought the bag, made the cupcake with felt and glued the pieces together, added ribbon, and wrote with shirt paint)

(didn't realize the pic was sideways until after uploading)


(so I added the one of the cat giving his stamp of approval)

My friend's youngest daughter just got her own bedroom for the very first time, she wanted a Webkinz room... so I freehanded these from looking at the icons on the website and then painted it on a flat canvas with acrylics....


Her third daughter got these headbands with felt roses glued on them that I made. She's all about being a girly girl...


And the oldest who loves purple and monkeys, got this hat box that I mod podged paper on and the little monkey is handpainted by me (bought blank at Michaels) and glued on the top... was supposed to be for the jewelry making stuff her mom got her- but that ended up distributed between all the girls.


And lastly...

I got my little Charlie neutered, so here we are- beginning week 2 of the conehead. He gets to stop wearing it on Thursday!


I have to thank all of you ahead of time as I go through a very difficult situation at this point in time. I am questioning myself and full of doubt with the choices I have made in life. I am working hard to overcome the shadows of my past that have defined me and made me into someone with almost no confidence who doesn't feel good enough for anyone. It has effected my entire life, and now it is effecting my career. So I now look ahead this year, just ahead to tomorrow really, and pray that I will be a little stronger than I was today... and another small step towards being more confident. Reading your blogs and experiencing the inspiration that I get from each of your crafts and posts is what brightens my every day. I am so extremely thankful for my friends and family who are supporting me as I deal with accepting that what I have worked so hard at isn't good enough for where I need to be in my fifth year of my job and doing everything in my power to break free of the past that has defined me for too long. I want to be the person I dreamed of being as a little girl, instead of the person I have let myself get trapped into by those who brought me down.

Much love to all of you and the very best of wishes...

More Sincerely than you will ever know,
Amy

Saturday, December 19, 2009

Flea Market, Dollar Tree, Dollar General, and Family Dollar!

I've just decided to run off and rummage through the flea market and dollar store in a couple hours. I'm hoping to find the following:

A chain and bells to make a card holder like the Centsational Girl:


Pretty random embellishments to help me make frames like Disney's @ Ruffles and Stuff:


Set of pin cushions to make Bob the Tomato like @ Dollar Store Crafts:


Glass candlestick holder and a pretty plate to make a cake stan
d like the one @ Oh So Crafty:
And also looking for some deer decorations, fabric, ribbon, buttons, whatever else floats my fancy! Check out the great bloggers I noted! You won't be disappointed!

Monday, October 12, 2009

Before and After Desk Chair AKA Cat Launching Pad

This old desk chair has been around since my mom was a teenager (she is now in her early 50s) and even before that as my grandpa got it off the curb when he was a garbage man. The bottom of the desk which my mom has stolen back says "Victoria Talking Machines". I've been told this was an old music player, no date on the label though so who knows how old it really is. Anyway, as you can see the seat has seen better days and the thing is super rickety.

Before:

And now, after unscrewing the old seat and ripping off the material, throwing away the saw dust filler, adding layers of an old sweater, covering with a red suede, spray painting the chair, distressing it (overly), and reattaching the seat we have my first ever chair redo/reupholster/distressing EVER!!! I'm excited about the finished product!!!


Even if it now only serves to match my kitchen as a launching pad for my old, fat, grouchy cat to get his booty up on the counter where his food bowl is so that he doesn't further destroy the beautiful handmade wood cabinets this house was blessed with.


After:


Saturday, October 3, 2009

Trash to Treasure: Help the Indecisive


(Yes, that's my fat cat Reggie trying to figure out what his crazy owner is up to now.)

Okay... so I have these two shelves that my aunt rescued from her neighbor as she prepared to put them out for trash. Now, I'm becoming less and less a fan of the fake wood finish that's on everything in my house.

Here's the question: What should I do with these?
1. Paint white and do the edges in a light pink
2. Paint white and leave alone
3. Paint ivory with edges in light pink
4. Paint ivory and leave alone

Sarah would paint them black... but her house is in darker fall/autumn colors and mine is in pastels for the most part- and these shelves are going in my pink bedroom (refer to this past Pink Saturday post to see it). Now, if I in the future decide I do not want a pink room- these would have to be repainted so I'm not caring what color they are done in now. Give me your opinions and help please!

Sunday, September 6, 2009

Tree Branches Galore...

Okay, so I'll be the first to admit that I have come to HATE yardwork. I made this huge flower bed last summer (only lived in my house for a year and a half now), thinking it would be less grass to mow, and despite all of my efforts it has been overtaken with weeds and grass. I also have an 8 foot tall fence out back that faces up against my neighbors privacy fence- but they left about a foot of weed growing space for me to enjoy... the weeds have trunks from B.M. (before move-in). I hate the jungle craziness, but this is all rambling because I am writing this post in reference to the pile of tree branches I have collected in my front flowerbed. Why haven't I broken them down and thrown them away you ask? Because it frustrates me that they had the nerve to fall out of the tree in the first place, and because they just poke holes through the sides of the bags and scratch me all up! So last year, I had this idea that I was going to use them to make a fall craft- I got frustrated and gave up when the branches wouldn't cooperate. So... what now? Well, there's a new bushel of them waiting my bad words and frustrated glares. Alas, I found this craft... it involves glittery diamondlike decoratives and reminds me of the winter snow I adore... so here's to Amy vs. the Branches: Year 2. I'll let you know how it turns out!

Check out the directions and idea at SaveOnCrafts.com


Monday, August 31, 2009

Creative To Do List

Unfortunately, with school back in swing and my duties keeping me busy I have not had time to craft and create- unless of course we are talking station charts, picture schedules, behavior plans, and bulletin boards. Here is a list of the creative things I'd like to try when I have another break (sorry for not posting pictures... I'm feeling incredibly lazy tonight):

1. Cute Address Display... over at The DIY Show Off she has created address numbers on flower pots and pumpkins! So cute!

2. Classy Wipe Off Calendar from Stacie over at The Creative Crate

3. Letter Block Displays also from Stacie at The Creative Crate

4. Basically anything from Stacie at The Creative Crate... judging by the starred projects on my Google Reader

5. My teaching clipboard is in need of some major love like this one from Amy at Modge Podge Rocks

Friday, August 21, 2009

Pink Saturday!!!!!!!

Okay Pink Saturday friends! This is a memory box I made for my friend that I teach with when she had her pink wedding :).


Popular Posts